Showing posts with label flour. Show all posts

Tuesday, 13 April 2021

Lemon and raspberry occasion cake

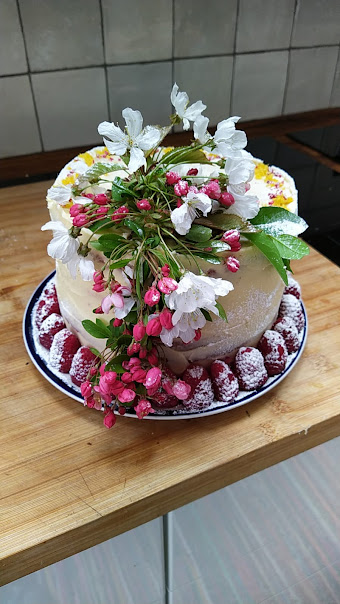
Cherry and hawthorn blossom adorn the cake


Sometimes you make an occasion cake, that has to look good, as well as taste good. I think I hit the mark with this one.

The cake is a basic sponge with equal weight of butter, sugar, eggs and flour, in this case four eggs set the weight. You can average an egg as 60g, so work that out if you like. The cooked cakes are cut in half and there are three layers of filling, each one had lemon curd, overlaid with cream and the cake above had raspberry jam. Someone said it was too tall, and it did have four layers, but then it was for an occasion.To stop the cream squirting out the side I laid raspberries to hold it in. Really, when all the layers were stacked up the whole looked a bit wobbly. A good ganache coating covers a lot of sins and that's what this cake got, white chocolate ganache.

I used a palate knife dipped into boiling water and dried, which makes it easy to move the ganache around, spread it where it needs to go. I can do piping but I don't enjoy it, and I think you end up with too much icing. So I go for a nice slather, and then in this case I draped spring flowers across it, bird cherry and pink hawthorn, both of which are edible if you wanted to eat them. The main thing is that they aren't toxic, and they look lovely.

Around the top of the cake I sprinkled lemon zest and freeze dried raspberry and added fresh raspberries around the base and dusted the lot with icing sugar.


Wednesday, 1 April 2020

reverse crumble chocolate dessert

Raymond Blanc’s reverse crumble chocolate dessert is something I've come across while cruising the interweb for chocolate cake recipes, because who doesn't? It looks pretty good. Overnight chill needed, and not much flour, so the current shortage of the stuff might not put you off, so long as you can get cream, butter, milk and eggs.

If you substitute gluten free flour in the crumble, you have a gluten free dessert. 

Method

Grease an 8”/20cm cake ring, line a baking tray with greaseproof paper and sit the ring on it

Set the oven to 160 fan oven 170 normal oven

For crumble
35g butter unsalted, cold
35g sugar demerera
pinch of salt
30g flour (gf if you like)
1/5 tsp cocoa powder

Combine to a breadcrumb texture to make a crumble and bake in oven 170 for 10-12m

for choc cream
90ml whipping cream
150ml full fat milk
155g 70% choc broken into pieces
1 egg

  • heat the milk and cream together to almost boiling
  • start beating the egg gently then slowly pour hot milk into the beaten egg continue beating to combine.
  • add the chocolate to the hot egg/milk mixture and keep beating slowly until the chocolate has melted completely, which may take a few minutes.
  • allow the mixture to cool then pour over the crumble base and leave to chill in the fridge overnight


Just before serving
  • slip the cake onto a plate
  • loosen the edge of the cake with a hot knife and remove the ring before serving

Sunday, 29 June 2014

Mary Norwak's Basic Cake Recipe

Aunt Clare lived in a number of picturesque villages through her lifetime, ending up in Cley next the Sea, on the North Norfolk coast. It is a lovely village, and is known by some as Cambridge by Sea, due to the fact that it is so popular eith people retiring from Cambridge. Mary Norwak was a long-term resident and friend of aunt clare, and besides writing many cookery books was happy to share her recipes and her baked goods at many village events.

This recipe is the traditional pound cake, or quatre quarts as they call it in France. Equal amounts of fat, flour, sugar and eggs, and with a strong arm or its electric equivalent, you can make this cake all in one.

I notice that my mum made a note in her lovely writing on the recipe written out by her sister, on the back of an envelope, in the traditional manner. Clare also added a note saying add vanilla and a little water. Mums note says add orange juice and zest for an orange version, and that is my favourite


butter and line 2x7"/18cm tin

set the oven to 170C or equivalent

4oz/110g sr flour
4oz/110g caster sugar
2 eggs
4oz/110g soft margarine
drop of vanilla

Put all together and beat well with electric beater. Put in two tins and bake in the centre of the oven for 20-30m
cool on rack in the tin - remove when cool

variations:
chocolate 1/3oz cocoa/flour (20/90g)/
orange add grated rind/juice of large orange


Wednesday, 6 November 2013

hazelnut crisp biscuits


The hazelnuts in these biscuits give a lovely flavour and aroma. Despite the sweetness there is a slight tang, almost bitter, probably coming from the skins, which I include, through laziness. They are lovely with a cup of tea or coffee. I know they are popular, because they disappear quickly.

The biscuit is not a shortbread, it is quite crisp.

They are very easy to make, but make sure that they don’t burn, they should be a nut brown. Appropriately.

I am only giving cup measures. A cup is about 2/3 of a mug – or a quarter cup is about the size of a demitasse coffee cup. Really, don’t fret about it. Use a sensible measure as a cup measure, something like a small bowl, and measure everything else in proportion.

INGREDIENTS

1/2 cup of butter or margarine
1 cup light brown sugar (I mix demerera and some brown)
1 egg
1 tsp. vanilla essence
1 cup plain flour
1/4 tsp baking poweder
1/2 tsp. salt

1/2 cup chopped hazelnuts

METHOD

Prepare two baking trays – lined with baking parchment or buttered and floured.

Set oven to GM 4/350F/180C degrees
quite airy and crisp
Grind up the nuts to the texture you like. I like some finely ground and some coarser bits and I use a hand blender with a lidded chopper attachment.
  • Beat the sugar and the butter together with the vanilla essence.
  • Beat the egg into the sugar mixture.
  • Beat in the flour until it all comes together
  • Drop by the teaspoonful onto the prepared sheets, leaving room to spread – press thin if you like


Bake for around 10 minutes – until they are a light nut brown. Keep an eye on them!
sideways but good!


Tuesday, 24 September 2013

biscotti for an autumn evening - you dictate the season

The autumn sun has just about set, I’m thinking ahead, and tonight I will indulge in an evening tipple, a little brandy perhaps. In my hand I want to see a little hard biscuit. Cantuccini, dipped in a little spirit, with a short coffee. The flavour is light, you can still taste the nuts as well as vanilla and a touch of cinammon. A winning combo, making a proper end to an evening. 

After some experiments I’ve mastered the recipe for cantuccini now. My first batch were definitely the dentist’s friend, requiring serious dunking, in tea coffee or alcohol to avoid that worrying bite and crunch, after which you couldn’t help wondering if there was a nut in your mouth or a fragment of something, that until very recently, had formed part of your dental infrastructure.

All in all, despite this being a two-step recipe, it is worth making the effort. The biscotti, apart from being the only thing in my cupboard with that name that is actually cooked twice, keep for ages, if you can hide them from the greedy. They are not too sweet either.

I have used mixed nuts and favour some brazil nuts and some hazelnuts as an alternative. I don’t want any fruit in there myself, but some people include raisins or apricots (chopped up). You don’t have to peel the almonds either, of course. Time to bake.

Tips:
  • The dough should be sticky but not wet. Eggs vary in size, as does opinion about what large means (thank you, Marks and Spencer). If your dough is not sticking together add a little water, drop by drop. Or you could add some alcohol, it will give the flavour a twist, something without too pungent. Not milk, since this is a fat free recipe, let’s not spoil it.
  • Don’t forget the salt, it makes a big difference, and I try to have fresh baking powder, because baking powder does go off and a poor rise is just depressing.
  • When you take the loaf out It’s worth waiting a while before cutting the first bake of the loaf into slices. I find a very sharp serrated knife works best. I’m also thinking of drying out the almonds a little before starting on this recipe. I skin the almonds by soaking them in boiling water, and that makes them a teeny bit soggy.

Set your oven to Gas Mark 4 (180°C/350°F).

RECIPE

Ingredients:
325g (12oz) plain flour
300g (11oz) caster sugar
1½ tsp. baking powder
½ tsp. ground cinnamon
½ tsp. salt
325g (12oz) whole blanched almonds
3 large eggs
2 tsp. vanilla extract

Method:
  • Prepare two baking sheets with baking parchment.
  • Roughly crush about a third of the almonds (I sometimes use 1/3 almond flour)
  • Mix the dry ingredients: flour, sugar, baking powder, cinnamon, salt and almonds.
  • Whisk the eggs and vanilla together and stir them into the dry ingredients, working it into a stiff dough (I use a fork). If it’s not all sticking together add a few drops of water.
  • Turn the dough out onto a floured board and divide into two.
  • Roll each half into a sausage and divide again into two, so you have four pieces. I do this because it fits on my baking tray, and makes slightly smaller biscotti.
  • Put the sausage shaped dough on the lined trays and flatten a little – they will spread a bit, so keep them well spaced.
  • Bake for about 30 minutes, or until the logs are well risen and have almost doubled in size.
  • Leave the oven on.
  • Cut into slices about 1cm thick. Some people say they should be smaller, but I can’t cut them that small. Don’t worry about leaving space between the slices.
  • Put the sliced dough back and cook for around 20 minutes more, until they are lightly toasted. Let them cool before storing (or eating).


Makes lots.

biscotti for an autumn evening - you dictate the season

The autumn sun has just about set, I’m thinking ahead, and tonight I will indulge in an evening tipple, a little brandy perhaps. In my hand I want to see a little hard biscuit. Cantuccini, dipped in a little spirit, with a short coffee. The flavour is light, you can still taste the nuts as well as vanilla and a touch of cinammon. A winning combo, making a proper end to an evening. 

After some experiments I’ve mastered the recipe for cantuccini now. My first batch were definitely the dentist’s friend, requiring serious dunking, in tea coffee or alcohol to avoid that worrying bite and crunch, after which you couldn’t help wondering if there was a nut in your mouth or a fragment of something, that until very recently, had formed part of your dental infrastructure.

All in all, despite this being a two-step recipe, it is worth making the effort. The biscotti, apart from being the only thing in my cupboard with that name that is actually cooked twice, keep for ages, if you can hide them from the greedy. They are not too sweet either.

I have used mixed nuts and favour some brazil nuts and some hazelnuts as an alternative. I don’t want any fruit in there myself, but some people include raisins or apricots (chopped up). You don’t have to peel the almonds either, of course. Time to bake.

Tips:
  • The dough should be sticky but not wet. Eggs vary in size, as does opinion about what large means (thank you, Marks and Spencer). If your dough is not sticking together add a little water, drop by drop. Or you could add some alcohol, it will give the flavour a twist, something without too pungent. Not milk, since this is a fat free recipe, let’s not spoil it.
  • Don’t forget the salt, it makes a big difference, and I try to have fresh baking powder, because baking powder does go off and a poor rise is just depressing.
  • When you take the loaf out It’s worth waiting a while before cutting the first bake of the loaf into slices. I find a very sharp serrated knife works best. I’m also thinking of drying out the almonds a little before starting on this recipe. I skin the almonds by soaking them in boiling water, and that makes them a teeny bit soggy.

Set your oven to Gas Mark 4 (180°C/350°F).

RECIPE

Ingredients:
325g (12oz) plain flour
300g (11oz) caster sugar
1½ tsp. baking powder
½ tsp. ground cinnamon
½ tsp. salt
325g (12oz) whole blanched almonds
3 large eggs
2 tsp. vanilla extract

Method:
  • Prepare two baking sheets with baking parchment.
  • Roughly crush about a third of the almonds (I sometimes use 1/3 almond flour)
  • Mix the dry ingredients: flour, sugar, baking powder, cinnamon, salt and almonds.
  • Whisk the eggs and vanilla together and stir them into the dry ingredients, working it into a stiff dough (I use a fork). If it’s not all sticking together add a few drops of water.
  • Turn the dough out onto a floured board and divide into two.
  • Roll each half into a sausage and divide again into two, so you have four pieces. I do this because it fits on my baking tray, and makes slightly smaller biscotti.
  • Put the sausage shaped dough on the lined trays and flatten a little – they will spread a bit, so keep them well spaced.
  • Bake for about 30 minutes, or until the logs are well risen and have almost doubled in size.
  • Leave the oven on.
  • Cut into slices about 1cm thick. Some people say they should be smaller, but I can’t cut them that small. Don’t worry about leaving space between the slices.
  • Put the sliced dough back and cook for around 20 minutes more, until they are lightly toasted. Let them cool before storing (or eating).


Makes lots.

Thursday, 19 September 2013

1kg coconut to use up

A kilo of dessicated coconut is a lot of coconut, even if you are very keen on coconut. I have no idea why I bought such a big bag. It is about half empty, and the best before date is two weeks away. So the race is on. So far apple and coconut cake and coconut shortbreads are on the menu, the cake is in the oven. I've tweaked it of course. The apples are bramleys, there is more coconut, some milk instead of yoghurt, and some creamed coconut for good measure. Also some topping.

going to need a sharp knife to cut this... and friends over

Saturday, 24 August 2013

Sourdough Bread

I've been working on my sourdough technique, along with thousands of others. I am using a wet dough, and results vary. The weather, the flour, the method and the time, all make a difference. One of the most successful things I made with the sourdough has been sweet buns, a sourdough brioche.


Sunday, 2 September 2012

choc and hazelnut biscuits, or cookies if you like


Hazelnut and Chocolate Cookies

I've been looking for a good cookie/biscuit recipe for some time, and then I came across this one. Rave reviews all round, along with much overeating on the biscuit front. The secret ingredient, because I don't usually keep it in the house, is condensed milk.

Depending on how long you cook these biscuits they can either be crunchy on the outside with a chewy centre or crunchy all the way through. If you can't wait for them to cool you'll get gooey chocolate too.

This recipe makes about 40 biscuits, if you make the roll about two inches/5cm in diameter. If you don't want 40 biscuits, keep a roll of the dough in the fridge, and eat within a week.

Ingredients
225g butter or margarine
not very round dough...

225g caster sugar
6 tbsp condensed milk
350g self-raising flour
100g dark chocolate
100g hazelnuts

Prep
Chop the roast hazelnuts and chocolate to a size that suits you. If you leave them too large, they will make cutting the dough into slices harder.
Beat together the fat, sugar and condensed milk, until well mixed and pale
Add in the flour and mix thoroughly
Stir through the nuts and chocolate
Divide the dough in two, and make two rolls about 5cm in diameter – using baking parchment will make this easier – and chill for around an hour

Cooking
20m before you are going to cook the cookies, heat your oven to 180C

Cut into slices slightly less than 1cm, say .6cm (joke)
Lay onto baking sheet lined with baking parchment, leave some space between them for spreading
Cook for around 15m or until golden brown

Friday, 27 July 2012

Cassis cake

success, this is two hours later...
Our blackcurrant bushes gave some delicious fruit this year, not tons of fruit, they are just established, but the  currants were plump, round and wonderfully black. I cooked them up in a pan with just a little sugar and tried them with yoghurt, but the flavour was very strong. So I decided to try them in a cake, just stirred into a basic sponge mixture. Result? Delicious.

I lined a large tart tin, and treated it like pudding, because I knew the fruit would sink, and I thought it might be a fall-apart-a-bit kind of a cake.  It worked, because it wasn't too tall, and didn't fall apart, however in a deeper tin I don't think it would work. So stick to a big tin, or halve the quantities and use a smaller tin.

If you don't have home grown fruit, use some frozen berries.

RECIPE

see how the fruit sinks through the cake mix
for 10"/25cm tart tin

Ingredients

mugful of blackcurrants or berries 
heaped tbsp sugar

cook on low heat for around 20m, don't allow to burn

four egg sponge ingredients (it's a clue)

set at 200C

4 eggs
250g each sugar, self-raising flour, butter
1/2 tsp baking powder
tsp vanilla

I use demerera sugar


  • Mix the lot together thoroughly
  • pour mixture into lined tart tin
  • spoon fruit mixture on in five big puddles and stir through quickly with spoon handle (don't mix completely, you're just marbling the mixture)
  • cook for 30m and check
  • ready when skewer comes out clean
  • leave to cool completely before removing from tin

Sunday, 17 June 2012

cake-meets-trifle

Traditional sponge cake is light and fluffy, with a fine texture, small bubbles. Tales abound about the best method to get the right result. Fillings in WI style versions include jam, or jam and cream. I recently savoured a family version made by Layla which had chocolate buttercream as well as cream teamed with strawberries in the sandwich, with cream and strawberries on top, together with shavings of white chocolate. That was very acceptable... I'll check if she took any pix before the ravening hoards disposed of it.

Cake-meets-trifle is a lemon sponge sandwich, filled with raspberry jam, whipped cream and strawberries. I sometimes use raspberries inside too, but they are very juicy and squash easily. The lemon sponge has lemon zest and lemon juice in it, which gives a wonderful tang that contrasts wonderfully with the soft and sweet filling. Sometimes I just dust the top with icing sugar, and sometimes I put more cream on top with some more fruit. If the cake is chilled it holds together better when it is cut. All in all, this is my most requested cake.

The original recipe I used was an all in one sponge, ideal for a food processor. I don't use one at the moment, so I have gone back to following the traditional approach, creaming the butter and sugar together, then adding the eggs and beating them in one by one, followed by the flour. I used self-raising flour, and add a little more baking powder to add a bit more lift. The zest is added to the butter, and the lemon juice is added right at the end.

Ingredients

zest of 1 lemon
200g  sr flour
200g fat (butter or margarine)
200g sugar
1/2 tsp baking powder
juice of 1 lemon

raspberry jam
double or whipping cream
punnet of strawberries

Method

Heat oven to 160 degrees

grease and line 2x8" cake tins 
  • cream sugar and fat with zest
  • add eggs blending one by one (add spoonful of flour if mixture splits)
  • add sifted sr flour blend, adding lemon juice as you go
  • spoon mixture dividing evenly between two lined tins 
  • bake for 20m and check by inserting a skewer, cake is ready when skewer comes out cleanly and the cake is drawing away from the sides
  • whip cream, cut strawberries in half, removing leaves
  • when the cakes are cool, remove from tin, peel off lining paper, spread jam over base sponge, spoon cream on and lay cut strawberries on top, lay top sponge on top
  • sprinkle with icing sugar if you fancy it
this quantity makes a good size cake, if you want a monster cake use 8" tins and double the quantities


Wednesday, 25 April 2012

dutch apple tart


Lovely biscuity pastry, and luscious cinnamon flavoured apples give your mouth and nose a treat - this tart also looks fantastic, and is pretty easy to make.

Ingredients
Pastry
1 egg
2 cups/250g self-rising flour
2/3 cup/150g butter chopped up small
½ cup/90g brown sugar
A pinch of salt
Zest of 1/2 lemon

Filling
Two handfuls/150g of sultanas
1 tbsp brandy or other alcohol (use juice or water if you prefer)
2 lb/850g tart apples
Juice of 1/2 lemon
Heaped tablespoon brown sugar (50 g)
2 tsp ground cinnamon
½ tbsp corn flour

Equipment
Loose based or springform tin, 20cm/8”
Two good sized bowls

Method
  • Soak the sultanas in the liquid of your choice for at least an hour – or heat in pan or microwave to speed things up, set aside.
  • Set oven to 180C/350F
  • Butter sides of the tin generously, and line the base with baking parchment. If you don’t have baking parchment butter the base and flour it, shaking out the excess
  • Put the flour into a large bowl, with the chopped butter, lemon zest and brown sugar
  • Whisk the egg, hold back about a tablespoon, and add the rest to the flour and butter
  • Knead dough, using a stand mixer with a dough attachment, or use your hands, until the dough comes together into a ball. Set aside for 20 minutes, while you peel and prepare the apples.
  • Peel and core the apples, cut them into pieces (about 1.5cm square, no need for precision)
  • In another bowl mix with the sultanas, lemon juice, the remaining 1/3 cup brown sugar, and spices
  • Sprinkle the corn flour over and stir to cover the apples with spices and sugar and mix in the sultanas
  • Use 3/4 of the dough to cover the bottom and sides of the dish, you can roll it out on a well floured board, or flatten it out and press the dough into place, nudging it along
  • Add the apple mixture to the pie dish and firmly press down
  • Use the rest of the dough to make the lattice topping, dividing it into five bits, rolling each one into a ‘snake’ and flattening it. Three strips one way and two the other, pressing them into the sides and trimming them so nothing hangs over the edge
  • Brush the lattice pastry with the egg and bake for around an hour, until the apples are tender
Serves 8

I use Bramleys if possible, and serve the pie cold. Eat with cream or ice cream, or on its own.
                                     

Monday, 26 March 2012

Burnt sugar cake

 Cruising the internet, I came across the intriguingly titled Burnt Sugar Cake. The flavour is reminiscent of butterscotch Angel Delight, for those old enough to remember that curious concoction. Chocolate Crunchie is an alternative reference. Intensely sweet.

It is a big cake, a very big cake. It went down well with friends.

The recipe I used is given in full below.

I may sometime try this alternative recipe, which may be lighter, but only once I've recovered from the extreme sweetness. It may be some time, and I think I’ll try using the syrup to flavour  some whipped cream, to put inside the cake.

Considering this recipe after time to digest, physically and mentally, I think this cake would be brilliant as a teatime bonne bouche, in a seriously reduced form. One mouthful would be an amazing an accompaniment to coffee, or coffee sorbet.

Burnt Sugar Syrup:
3/4 cup sugar
3/4 cup boiling water

Burnt Sugar Cake
3 cups/360g sifted cake flour
2 teaspoons baking powder
½ teaspoon salt
¾ cup sweet butter, room temp
1¼ cups granulated sugar
3 eggs, room temp
½ cup Burnt Sugar Syrup
water
1 teaspoon vanilla

Burnt Sugar Frosting
¼ cup/60g unsalted butter
1 lb/450g icing sugar
¼ teaspoon salt
¼ cup Burnt Sugar Syrup
1 teaspoon vanilla

RECIPE

Burnt Sugar Syrup
1.    Melt ¾ cup sugar in a skillet over low heat, stirring occasionally, until it turns into amber (burnt orange), then take it off the heat
2.    Add boiling water very carefully, as the mixture will spatter at first, the return the caramel to a low heat and simmer while stirring, until the sugar and water are thoroughly mixed together
3.    Set to one side to cool – use at room temperature

Burnt Sugar Cake
·         Set the oven to 350/180 (slightly less for fan assisted overns)
·         Grease and flour two 9”/22cm cake tins, and line them with parchment or waxed paper
·         Sift flour, baking powder and salt together
·         Cream the butter, beating until smooth, adding sugar and continuing to beat until the mixture is light and fluffy
·         Add the eggs, one by one, beating to a smooth mixture before adding the next egg.
·         Mix together ½ cup of burnt sugar syrup with enough water to make one cup of liquid and stir in the vanilla
·         Beat the dry ingredients into the butter mixture alternately with the burnt sugar syrup mixture, beginning and ending with dry ingredients, until the mixture is smooth
·         Divide the batter between the 2 cake pans
·         Bake for around 25 minutes, or until the surface springs back slightly when lightly touched in the centre, and the cakes come away from the sides of the cake tins
·         Let the cakes cool for at least 10 minutes on wire racks before tipping out the cakes
·         Allow cakes to cool completely before starting to ice the cake
·         Split each cake into two, and fill each layer with icing, before covering the top and sides

Burnt Sugar Frosting: 
1.    Cream 1/3 cup unsalted butter until light and fluffy
2.    Gradually beat in the sifted icing sugar, almost ½ cup Burnt Sugar Syrup and 1 teaspoon vanilla until creamy, smooth and spreadable
.


Incredibly rich!