Showing posts with label lemon juice. Show all posts

Tuesday, 13 April 2021

Lemon and raspberry occasion cake

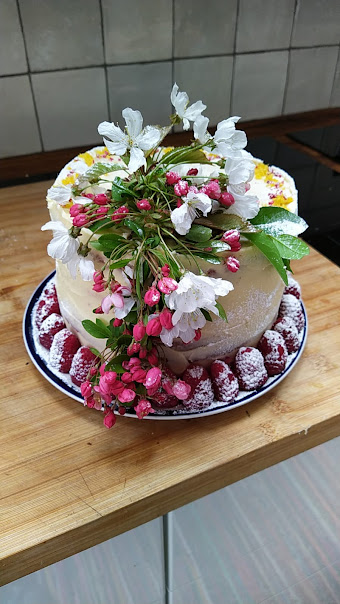
Cherry and hawthorn blossom adorn the cake


Sometimes you make an occasion cake, that has to look good, as well as taste good. I think I hit the mark with this one.

The cake is a basic sponge with equal weight of butter, sugar, eggs and flour, in this case four eggs set the weight. You can average an egg as 60g, so work that out if you like. The cooked cakes are cut in half and there are three layers of filling, each one had lemon curd, overlaid with cream and the cake above had raspberry jam. Someone said it was too tall, and it did have four layers, but then it was for an occasion.To stop the cream squirting out the side I laid raspberries to hold it in. Really, when all the layers were stacked up the whole looked a bit wobbly. A good ganache coating covers a lot of sins and that's what this cake got, white chocolate ganache.

I used a palate knife dipped into boiling water and dried, which makes it easy to move the ganache around, spread it where it needs to go. I can do piping but I don't enjoy it, and I think you end up with too much icing. So I go for a nice slather, and then in this case I draped spring flowers across it, bird cherry and pink hawthorn, both of which are edible if you wanted to eat them. The main thing is that they aren't toxic, and they look lovely.

Around the top of the cake I sprinkled lemon zest and freeze dried raspberry and added fresh raspberries around the base and dusted the lot with icing sugar.


Sunday, 21 July 2019

Slow cooked lamb, Greek style - Kleftiko

This recipe produces slow cooked tender lamb that falls apart easily and melts in the mouth. It makes the idea of being toothless not such a worry - a comfort to the ageing. It's gently flavoured with lemon and oregano backed up by the warmth of cinnamon, all of which soak into the potatoes sit under the lamb as it cooks. The resulting juice has a silky translucence.

I use Felicity Cloake’s Kleftiko recipe. I’ve edited it into steps to make it easier to plan the cooking. This is an easy dish with not too many ingredients, and the flavours are lovely, the lemon sings through.

I have failed to take any pictures both times I have made this meal - next time I make it…. pix to follow.

You need to start preparing this dish the day before, because the meat needs to marinade at least 12 hours. You can leave it a bit longer. I’ve tried making it ahead - up to the last two steps (completely cooked, just needs blasting at a hot temperature) - and everyone was happy, but I preferred it cooked and served immediately.

I have scaled this dish up to serve 20 people, doing a whole shoulder cut into two, and that works fine. I’ve also included a bit more liquid and more potatoes and that works too. It's an adaptable and forgiving recipe.

If you're feeding a crowd keep them happy with some easy starters, watermelon and mint, hummus and pitta, sliced cucumbers, a simple herby salsa, tzatziki. Buy them in, why not?

I like to serve a green salad alongside the lamb, with crusty bread.

Kleftiko

(serves 6)
1 lamb shoulder, about 2kg
Olive oil
1 tsp cinnamon
1 tsp dried oregano
1 tsp salt
1 1/2 heads of garlic
2 lemons
1 kg waxy potatoes
1 large red onion
1 red pepper
1 bay leaf
12 cherry tomatoes or 3 large tomatoes cut into quarters

Step 1 - day or night before serving

  • Make a paste with the oil, juice of one lemon, cinnamon, oregano, salt, half a head of garlic (crushed cloves)
  • Rub paste into the meat and leave for 12 hours
Step 2
  • Heat the oven to 160C. 
  • Use a large lidded casserole large enough for the shoulder and vegetables, or use a baking dish with a lid of double layer of baking parchment
  • Cut the peeled or cleaned potatoes into wedges and spread across the bottom of the dish
  • Cut the onion into wedges and the seeded pepper into chunky strips alongside the cherry tomatoes.
  • Cut the remaining garlic and lemon across their width, squeeze the lemon briefly over the potatoes, and put the hollowed out lemons, the garlic and a bayleaf into the middle of the dish.
  • Pour in 200ml of water and set the lamb on top of the lemon, garlic and bayleaf, pushing it in gently.
  • Seal in the meat and veg using baking parchment under the lid, or tucking the double layer of parchment around the meat to enclose everything. 
  • Bake for 4-5 hours until very tender.
  • Turn the oven up to 220C remove the lid or paper and roast, uncovered, for 10-15 minutes
  • Set the meat aside and cover
  • Roast the veg for another 15 minutes at the higher temperature so they brown and the liquid reduces
Serve the meat and veg together


Tuesday, 3 September 2013

last gasp picnic

I learnt my picnic technique from my mother, who could prepare a hamper with a whole salmon and all the trimmings to feed 10, throw together a sandwich or knock up a fire on a beach and cook sausages. It helps to have the right gear, but the main ingredient necessary is being up for it.

Yesterday the local festival, here in the cultural centre of the world, Cricklewood, had scheduled an outdoor showing of Some Like It Hot in a park on the dark side (Barnet). Hurray for the Cricklewood Silk Road Festival. Outdoor viewing said picnic to me. So I started getting the picnic kit together, and decided on the menu: chicken and salad wraps with cider to wash them down.

The chicken was marinaded for a few hours and then thrown on the griddle. It cooked beautifully, but left me wishing that I'd spared my clean hob and grilled it instead, letting the oven take the flack. I finally cooked some of the lovely looking split peas I have had for a while, to make a herby salad, and the mayo in the jar was going to get a makeover with paprika and friends. Add some rocket and a wrap, and napkins would be needed to catch the drips and wipe the mouth while it was being devoured.

What else do you need for a picnic? Leaving aside the hordes of helpers to carry the full dining table, crockery and chandelier, I prefer not to do disposable. This the gear I go for:


  • a drying up cloth (tea towel to some) with cutlery rolled into it: sharpish knife, spreading knife and spoons
  • duralex glasses or other almost unbreakable glasses, in another cloth, to prevent cracking
  • picnic blanket, such as bedspread or a couple of sheets. 
  • cold bag or box with ice, camping cold pack or my preferred version, a not quit full plastic bottle of water - if it's full it cracks btw. And maybe some ice to throw into a drink as well.
  • food
  • drink
  • something warm to wear in case the weather changes
So this is a cookery blog, let us consider the food prep. 

Chicken with basil and parsley marinade

Ingredients:
  • Chicken pieces - I cut up a whole chicken following this video , but cutting it into eight pieces
Marinade
  • 1 clove garlic
  • small bunch of basil
  • small bunch of parsley
  • juice of 1 lemon
  • olive oil
  • glug of cider
  • pepper and salt
  1. blitz the garlic, basil, parsley and lemon juice together, or chop the dry ingredients finely and then add the liquid and seasoning
  2. mix with the chicken pieces and leave for a few hours - to speed things up you can slash the pieces to help the marinade penetrate
  3. to cook grill or griddle all the pieces until both sides are well browned, about 5m a side

Maionnaise with additions - I like to add paprika, garlic, lots of pepper, lemon and olive oil to bottled mayo, to give it a kick. This salad is refreshing and not too heavy, the peas should be firm but not at all hard, and they keep a lovely green colour. The herbs and lemon lift the flavour.

split pea salad
  • small bowl of split peas
  • handful of each: mint, parsley, coriander
  • 1 clove garlic
  • two tomatoes
  • half an onion
  • pepper
  • salt
  • lemon juice
  • olive oil
  1. cook the split peas in boiling water, it takes about 20 minutes
  2. deseed the tomatoes and dice the flesh
  3. finely chop all the herbs, onion and garlic
  4. drain the cooked peas - they should still be firm - and mix in the herb mixture, and leave to cool
  5. add chopped tomatoes, then pepper, salt, lemon juice and olive oil to taste
For the wrap, I start with a smear of the spiced up mayo, add rocket, pea salad and bits of chicken, and then I roll the lot up, carefully folding one end. Don't think it won't drip, because it will.


Thursday, 7 March 2013

fish dish and green sauce

When picky teen daughter is out we've been sneaking in a bit of fish. My preference is for fried fish with steamed spuds, but when the floury pleasuregivers are not available I will make do with rice.

Any filleted fish will do, but we've tried sea bass (covered in seasoned flour), pollock (rolled in seasoned flour, then in egg followed by fresh breadcrumbs) and salmon (just pepper). I fry them for a minute a side, apart from the salmon, since it is thicker it gets about two minutes a side. After cooking I let the fish sit for a moment, during which it goes on cooking.

The green sauce is a grab it sauce in terms of ingredients. I often have parsley, coriander and dill hanging around, and I throw a good handful of each into the blender with a clove of garlic, pepper and salt and blitz the lot. Adding a bit of oil and lemon juice or vinegar gives a lovely dense sauce. Adding assorted pickles (capers, gherkins, jalapenos) adds a vinegary tinge.You can also add maionnaise, and/or yoghurt or creme fraiche. Anchovies may also put in an appearance, to be blitzed. I like to have a smooth base and then add some texture by chopping an onion very finely by hand, sometimes a hard boiled egg might be added. Green sauce is a lovely accompaniment to fish and pots. 

Friday, 27 July 2012

butterbean houmous

couldn't wait to eat it
Quickly made, butterbeans mixed some of the cooking liquid, together with a tablespoon of tamari, garlic, parsley, olive oil and lemon juice. Yum

RECIPE

half a tin of butterbeans (around 200g)
1 tbsp tamari
1 clove garlic
handful of parsley (leaves only)
olive oil
lemon juice (from half lemon/1 tbsp)
pinch of salt
Method

I use a stick blender, but you could mash the beans with a fork, or use a liquidiser instead. If you are using a fork, remember to chop the pasley and garlic really fine, otherwise you'll end up with parsley in your teeth and surprising lumps of garlic every few mouthfuls. DON'T go mad with the blender, the beans may become a bit chewy.


  • drain the butterbeans, keeping back a little liquid
  • put butterbeans, garlic, tahini, roughly chopped parsley, a couple of slugs of olive oil and blend until smooth, no longer
  • add some liquid if it becomes a bit dry
  • taste, and adjust salt if you like


amazing olive oil made by friends
you are unlikely to find a better olive oil than the one we received from Paula, Kevin and Alice

Sunday, 17 June 2012

cake-meets-trifle

Traditional sponge cake is light and fluffy, with a fine texture, small bubbles. Tales abound about the best method to get the right result. Fillings in WI style versions include jam, or jam and cream. I recently savoured a family version made by Layla which had chocolate buttercream as well as cream teamed with strawberries in the sandwich, with cream and strawberries on top, together with shavings of white chocolate. That was very acceptable... I'll check if she took any pix before the ravening hoards disposed of it.

Cake-meets-trifle is a lemon sponge sandwich, filled with raspberry jam, whipped cream and strawberries. I sometimes use raspberries inside too, but they are very juicy and squash easily. The lemon sponge has lemon zest and lemon juice in it, which gives a wonderful tang that contrasts wonderfully with the soft and sweet filling. Sometimes I just dust the top with icing sugar, and sometimes I put more cream on top with some more fruit. If the cake is chilled it holds together better when it is cut. All in all, this is my most requested cake.

The original recipe I used was an all in one sponge, ideal for a food processor. I don't use one at the moment, so I have gone back to following the traditional approach, creaming the butter and sugar together, then adding the eggs and beating them in one by one, followed by the flour. I used self-raising flour, and add a little more baking powder to add a bit more lift. The zest is added to the butter, and the lemon juice is added right at the end.

Ingredients

zest of 1 lemon
200g  sr flour
200g fat (butter or margarine)
200g sugar
1/2 tsp baking powder
juice of 1 lemon

raspberry jam
double or whipping cream
punnet of strawberries

Method

Heat oven to 160 degrees

grease and line 2x8" cake tins 
  • cream sugar and fat with zest
  • add eggs blending one by one (add spoonful of flour if mixture splits)
  • add sifted sr flour blend, adding lemon juice as you go
  • spoon mixture dividing evenly between two lined tins 
  • bake for 20m and check by inserting a skewer, cake is ready when skewer comes out cleanly and the cake is drawing away from the sides
  • whip cream, cut strawberries in half, removing leaves
  • when the cakes are cool, remove from tin, peel off lining paper, spread jam over base sponge, spoon cream on and lay cut strawberries on top, lay top sponge on top
  • sprinkle with icing sugar if you fancy it
this quantity makes a good size cake, if you want a monster cake use 8" tins and double the quantities


Tuesday, 24 January 2012

Lemon poppy seed cake


Lemon poppy seed cake
Lemon cake, when it has an acid bite, is a thing of great joy, all zingy pleasure as it hits your tongue, with a follow through of soft sweet cakiness. Adding beautiful grey blue poppy seeds lends an additional crunch and a light shade of nuttiness. It’s true that poppy seeds are tiny, hellish if spilled and they get stuck in your teeth. They aren’t something that most of us buy as a routine, but they are a small pleasure that is worth indulging from time to time.

On top of having more juice in than any other recipe I’ve found, this cake gets additional tang from a syrup that you pour over the cake when it is fresh out of the oven. I pour the syrup on to the bottom of the cake while it’s still in the tin, let it cool for a while and pour the syrup on to the top.  I find there is enough syrup left over to mix into crème fraiche, if you fancy it, which I do.

So when you read the recipe you may think it’s a bit fiddly, and it is, but only a little bit. This cake is a treat and the lemon cakiness peppered with the poppy seeds is lovely to look at as well as eat. So a little extra work pays off.

I’m going to try this with orange juice soon.

Photos follow.

RECIPE

Ingredients
  • ·         50g (1/3 cup) poppy seeds
  • ·         60ml (¼ cup) milk
  • ·         185g butter
  • ·         1 tbsp finely grated lemon zest
  • ·         220g (1 cup) caster sugar
  • ·         3 eggs
  • ·         225g (1 ½ cups self-raising flour
  • ·         60g (½ cup) plain flour
  • ·         60g (½ cup) ground almonds
  • ·         125ml (½ cup) lemon juice

o   For the syrup
o   220g (1 cup) caster sugar
o   160ml (2/3 cup) lemon juice
o   80ml (1/3 cup) water
Method
  • ·         Set the oven to Gas Mark 4/ 350F/ 180C/160C fan-assisted
  • ·         Grease 23cm cake tin thoroughly
  • ·         Mix poppy seeds and milk and set aside
  • ·         Beat the butter, rind and sugar together until light and fluffy
  • ·         Beat in the eggs, one at a time, making sure they are combined
  • ·         Add the dry ingredients and mix together
  • ·         Add the juice and the poppy seed mixture
  • ·         Spread into the greased tin
  • ·         Bake for about 55m or until a skewer inserted comes out clean

o   For the syrup
o   Put the sugar, juice and water into a small pan on a low heat without boiling, stirring, until the sugar has dissolved
o   Once the sugar has dissolved,  bring to the boil and simmer, uncovered without stirring for two minutes

Let the cake stand for about five minutes,  then stab gently here and there with a skewer, and spoon the syrup about a third of the syrup over while the cake is in the tin. Let the cake stand another five minutes and then turn it out carefully onto a rack set over a large plate or tray, then spoon over the rest of the syrup. Scoop up the syrup that isn’t absorbed and set it aside if you want to use it later. Let the cake cool completely before putting it onto a serving plate.